Getting a first project online can feel like a maze of hosting providers, build settings, domains, databases, and deployment pipelines. You do not need to start with a complex cloud architecture. This guide takes a small project from a working folder to a public URL, explains which steps apply to different kinds of apps, and shows what to check when something fails. The basic route is: identify what your app needs, put its source in Git, select a host that can run it, configure the production settings, deploy, test the real URL, and keep a simple way to update or recover it.
1. First work out what you are deploying
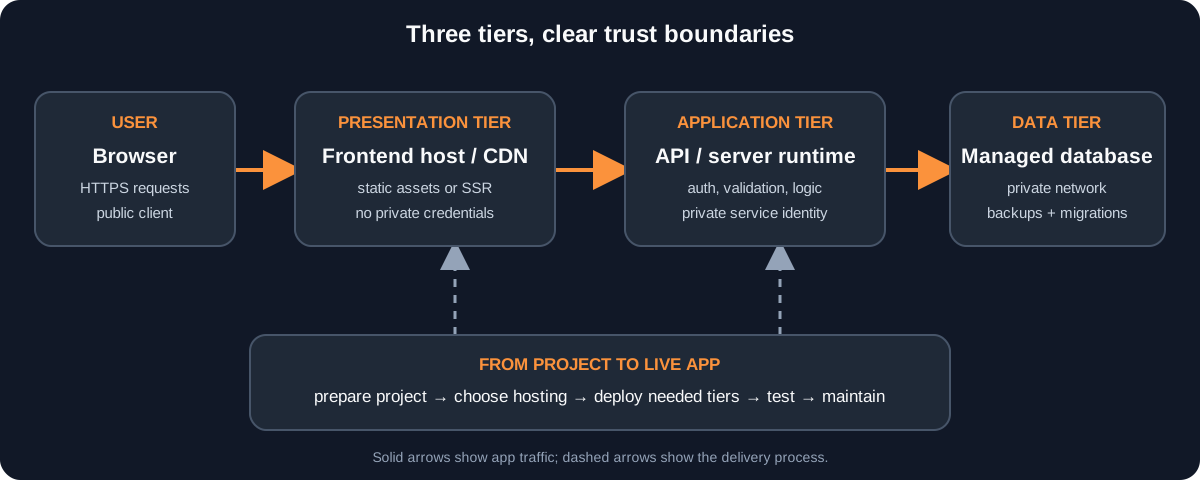
Look at the project and answer three questions. Does it produce browser files such as HTML, CSS, and JavaScript? Does it also need a server process for private logic, APIs, authentication, or server rendering? Does it save information that must still exist after a restart? The answers determine the hosting, not the language name alone.
- Static site or browser-only app: deploy the generated build to a static host or CDN. Examples include a portfolio, landing page, or client-only tool.
- Server-rendered app or API: deploy the server to a platform that supports the framework and runtime; a static host alone cannot run a persistent API process.
- App with saved user data: provision a database or durable storage service as well as the app. A local database file or development machine is not a production data plan.
A small app can use one provider for several services or separate providers. A frontend host such as Netlify, Vercel, Cloudflare Pages, or GitHub Pages can suit static projects; server platforms such as Render, Fly.io, or a cloud provider may fit applications that need a runtime. Names are examples, not endorsements, and free plans, supported frameworks, and limits change. Before choosing, check the provider's current documentation for runtime support, deployment steps, regions, sleeping or quota behavior, custom domains, logs, backups, and total cost. Start with the simplest service that actually runs your project.
2. Make sure the project works before uploading it
Run the app locally using the instructions in its README. Install dependencies from the lockfile, run its tests if available, and create a production build. Find the exact build command and output folder in the framework documentation or project configuration; do not guess the folder name. If the project only works because of files or settings on your own computer, document or add the missing setup before expecting a hosted builder to succeed.
Remove local credentials and generated files from the repository. Add environment files to .gitignore, and commit a safe example file containing variable names but no real values. Keep a lockfile so the host can install repeatable dependency versions. Add a README with the runtime version, install, test, build, and start commands. Check that the production build does not depend on a development server.
# Check the current project state
git status

# Add and commit project files, then publish the current branch
git add .
git commit -m "Prepare project for deployment"
git push
These commands assume Git is already initialized and a remote repository is configured. If this is the first push, create a private or public repository on your chosen Git provider and follow its instructions for connecting the local folder. Review git status before committing; never push passwords, private keys, production data, or a filled-in .env file.
3. Deploy a frontend using the simplest suitable route
For most beginner projects, connecting a Git repository to the hosting provider is easier to maintain than uploading files manually. Create an account with the selected host, choose its option to import or create a project from Git, authorize access only to the intended repository, and select the project branch. In the build settings, confirm the framework, install/build commands, and output directory. Set the required runtime version if the host offers that setting, then start the first deployment and read its build log from the first error upward.
When the build finishes, open the temporary provider URL. Check the home page and at least one nested route, image, form, and important interaction. For a single-page app, configure the host's documented route fallback if refreshing a nested route gives a 404. For a GitHub Pages project site, configure the correct base path because the site may live below the domain root. Server-side rendered applications need a supported server runtime or framework adapter; do not publish only browser assets if the app requires server rendering.
A successful deployment log is only a build confirmation. The temporary URL proves whether the deployed output works in a browser. Fix visible errors before attaching a custom domain or announcing the site. Once Git integration is enabled, later pushes can create preview deployments or update the production site according to the host's branch settings.
4. Add a server and database only when your app needs them
If the project has an API or server-rendered pages, create a service on a platform that supports its runtime. Follow that platform's setup for the repository, runtime version, build command, and start command. The server must listen on the port provided by the platform when required, and it should log startup failures in the platform's log viewer. Do not assume a process running on your laptop can be reached from the public internet.
If the application saves accounts, orders, or other durable information, create a production database using the provider's documented setup. Store its connection string only in server-side environment settings. Configure the app's database access to use a restricted account and encrypted connections where supported; keep the database private when the provider allows it. A public browser bundle must never contain a database password or private API key. Back up important data and learn how to restore it before relying on it.
Create production schema changes with the project's migration tool and test them against a development or temporary database first. Do not run a command that drops, recreates, or seeds production data as part of a first deployment unless you fully understand and intend its effect. If a change could remove or rename data, make a backup and plan the migration and code rollout. The API should connect to the database; the user's browser should call the API rather than connect directly to a private database.
5. Configure production settings and secrets
Local development values rarely match production. Add the required variables in the host's project or environment settings and select the correct environment, such as preview or production. Common values include a public site URL, an API base URL, and server-side database credentials. Use the exact names your application reads. After changing a build-time variable, trigger a new build because some frameworks embed public configuration when they compile the frontend.
# .env.example: document names and safe local defaults only
PUBLIC_API_BASE_URL=https://api.example.com
DATABASE_URL=replace-with-a-local-development-value

# .gitignore: keep real local values out of Git
.env
.env.*
!.env.example
The example above is a template, not a production credential file. Never commit actual secrets. Any variable included in client-side JavaScript is visible to visitors, regardless of its name; only non-sensitive configuration belongs there. If a secret is accidentally pushed, remove it from active use and rotate it, even if the repository is later made private.
6. Connect a domain and check HTTPS
You can first use the provider's temporary URL, then buy or use a domain from a registrar. In the hosting dashboard, add the domain and follow the provider's exact DNS instructions. Depending on the setup, this can mean adding a CNAME, A/AAAA, or other record. DNS values differ by provider, so copy the required record type, host/name, and target rather than using a generic tutorial's values. DNS updates can take time to appear.
Wait until the provider confirms the domain is verified and HTTPS is active. Test both the root domain and www hostname if you configured both, choose one preferred version, and confirm the other redirects correctly. Update application callback URLs, OAuth settings, CORS allowlists, and public site URL variables to the final domain where needed. Check for mixed-content warnings if the page loads insecure resources over HTTPS.
7. Test the live project and fix common deployment problems
- Open the production URL in a private browser window and test the main task a user came to do.
- Refresh a nested route, check images and styles, submit a test form, and inspect browser developer tools for failed requests.
- For a full-stack app, confirm the browser reaches the API and the API can access the database without exposing credentials.
- Review the host's build and runtime logs. Identify whether the error happened during installation, build, server startup, or a request.
- After changing configuration or code, redeploy and repeat the check; do not assume the previous deployment updated itself.
- Build command or output directory error: run the production build locally and compare the command and generated folder with the host settings.
- Works locally, fails online: check missing environment variables, runtime-version differences, case-sensitive file paths, and assumptions about local files.
- Nested route returns 404: configure the framework's required rewrite/fallback, or deploy the server-rendered app to a compatible host.
- Frontend request fails: verify the production API URL, server logs, CORS configuration, and whether the API is reachable over HTTPS.
- Database connection fails: verify the server-side connection setting, credentials, network permissions, and provider-specific connection requirements; do not make a private database public as a quick fix.
- Domain or certificate is pending: compare DNS records with the host's instructions, allow propagation time, and avoid repeatedly changing records while verification is in progress.
8. Keep deploying changes safely
Once the first deployment works, keep the same path for future changes: edit locally, commit to Git, push to a branch, preview the result if available, then merge or promote it to production. Turn on the provider's automatic deployment from the intended production branch. For an early personal project, the host's built-in Git integration may be all the automation you need.
GitHub Actions is an optional next step, not a requirement for getting online. Add it when you want repeatable tests, builds, or a deployment that your host's Git integration does not provide. Start with pull-request checks and read-only permissions. Configure production deployment only after the basic release path is understood, and use the hosting provider's documented integration or action rather than copying a workflow for a different platform. Never give an untrusted pull request production secrets.
Keep a record of how to deploy, where logs live, which domain is canonical, and how to restore important data. If a new release breaks the site, use the provider's previous-deployment rollback when appropriate, or redeploy the last known-good commit. Restoring database data is a separate operation; an application rollback does not undo changed or deleted records. For the next steps after launch, use our technical SEO and Search Console guide to inspect crawling and search visibility, and the Playwright testing guide for browser checks.
The first successful deployment does not need a complicated architecture. Get the smallest version of the project live, verify it from a user's point of view, protect its credentials and data, and improve the release process as the project grows.